How do I migrate mail between servers if I use IMAP?
Typically, when you migrate to a new server, your old emails will not be available unless you migrate them manually. This article presents an easy method of transferring email from one server to another, using matching IMAP email accounts in your favorite local email software. Using IMAP avoids formatting and permissions problems that may result from moving the raw mail files.
Requirements
- Linux or Smartermail IMAP account with hosting.ca
- Both of your servers must support the IMAP email protocol.
- The password for the email account you are trying to migrate created at hosting.ca.
- An IMAP-capable local email client. Most email clients like Outlook, Apple Mail, and Thunderbird support IMAP mail accounts.
Things to consider
Here are a few limitations to be aware of:
- You can only migrate items in a user’s inbox or other mail folders. This type of migration doesn’t migrate contacts, calendar items, or tasks. It’s because you’re using an IMAP server. To utilize contacts, calendars, tasks, see our Exchange plans.
- You can migrate a maximum of 500,000 items from a user’s mailbox (emails are migrated from newest to oldest).
- The biggest email you can migrate is 50 MB.
- If you limited the connections to your source email system, it’s a good idea to increase them to improve migration performance. Common connection limits include client/server total connections, per-user connections, and IP address connections on either the server or the firewall.
Steps
- Create the same email account on your new server that you had on your old server.
- Give the new email account the same password that you used on your old server. You can change the password after the migration process is done, if desired.
- In your local email client, create two new email accounts.
- These will both be for the same email address.
- They will both use the same password.
- They must both be configured to connect using IMAP.
- The incoming server (or IMAP server) will be different for each account. You should use your IP address for your new server, and your access domain or IP address for your old server, rather than your domain name, whenever possible. This will avoid any possible DNS conflicts.
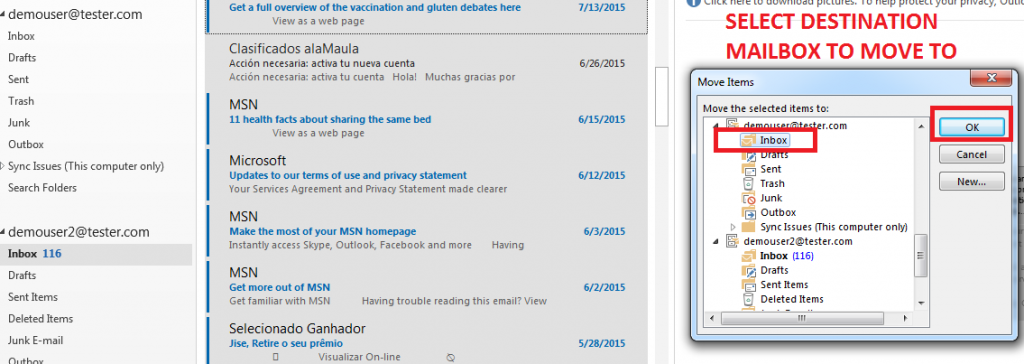
- With both accounts online, open up the inbox for the account that connects to your old server. Drag and drop messages from this inbox to the inbox on your new server. Or choose the MOVE menu function. Yes, it’s a manual process that needs care and attention. This is the nature of IMAP migrations.


- That’s it! If you have a lot of emails, give the accounts a few minutes to finish syncing up. Once they’re done, your old emails will be in your mailbox on the new server.